skullbrain.org
http://skullbrain.org/legacy/

Custom Clear Eyezon - finished! 10.11.2010
http://skullbrain.org/legacy/viewtopic.php?f=19&t=35836
Page 1 of 2

Author:  idle. [ Fri Jun 25, 2010 10:51 am ]
Post subject:  Custom Clear Eyezon - finished! 10.11.2010

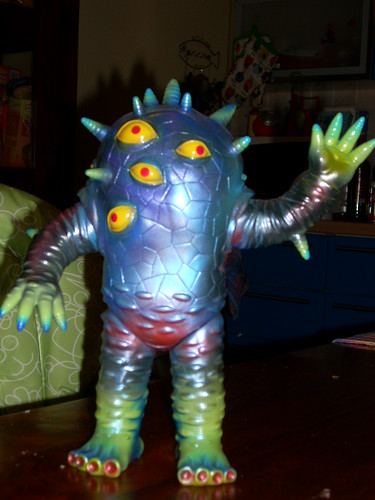
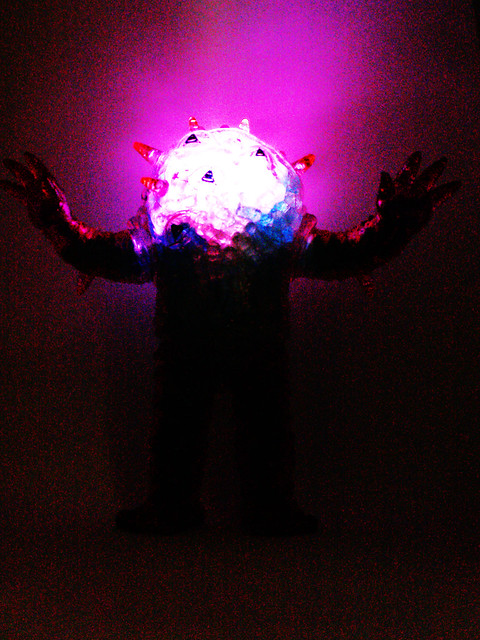
Hi fellow skullbrainers,

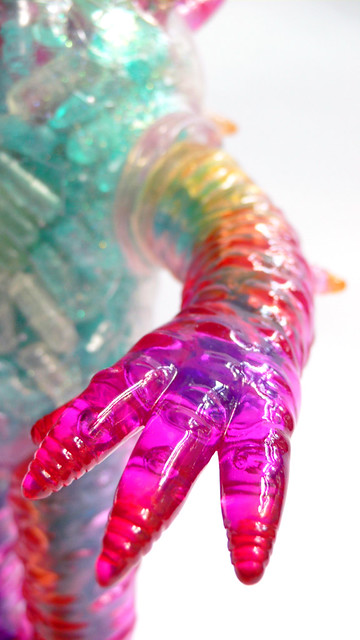
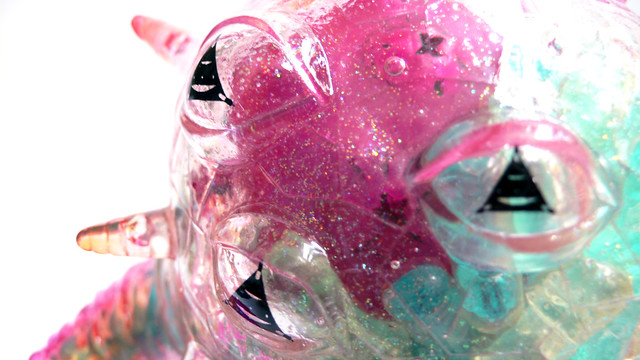
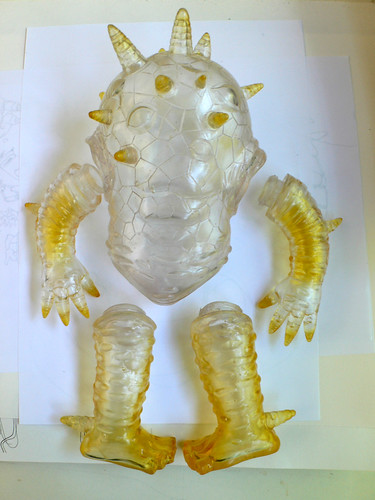
I just got this fancy clear eyezon with innards. I am not quite sure which direction this is going to take but before I head into any stuffing and painting I thought I also share some of the basic steps. Good ol work in progress...

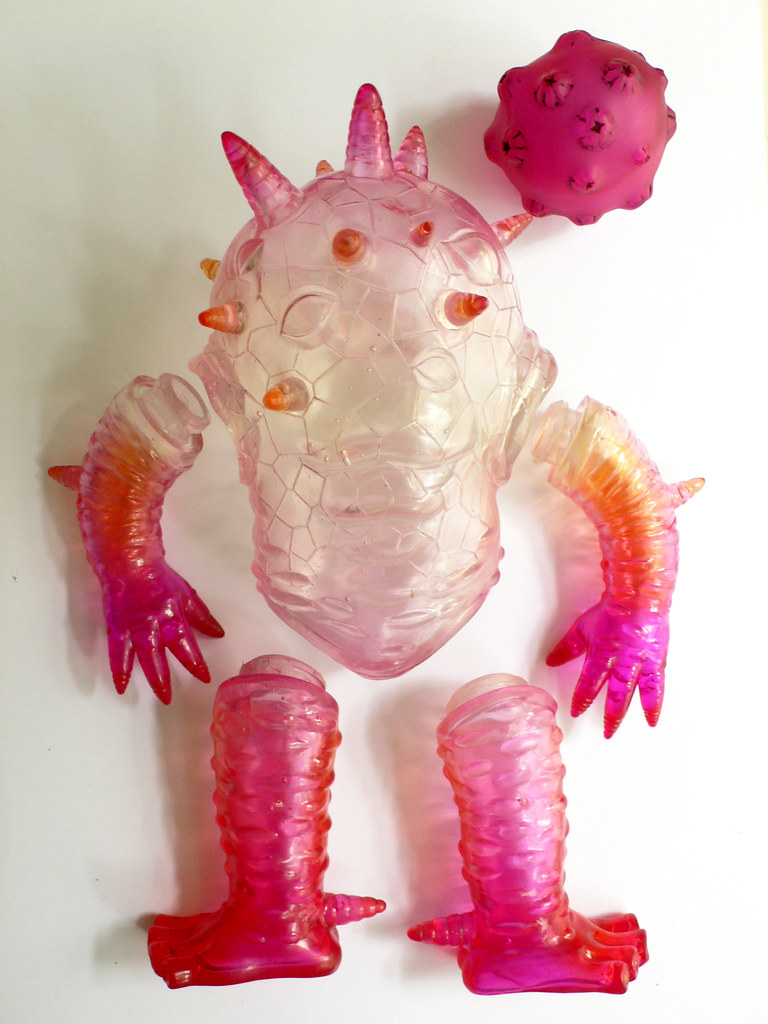
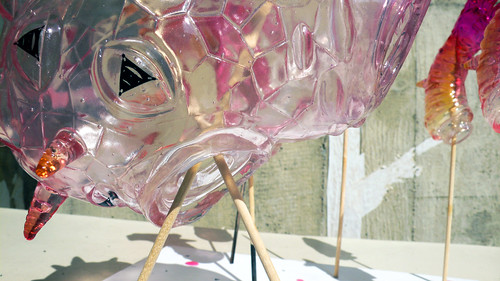
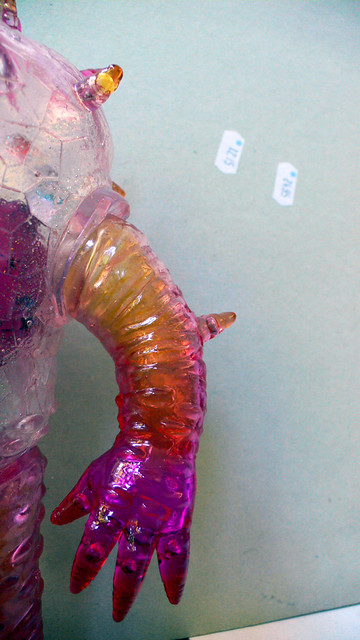
First thing to do in this case was to take the toy apart. I do this with a blow dryer to soften the vinyl. This was also necessary to be able to remove the innards as well. Interesting is that these are actually made of a soft rubber and not made from vinyl. I was surprised at first but it makes sense once you think about it.

Image

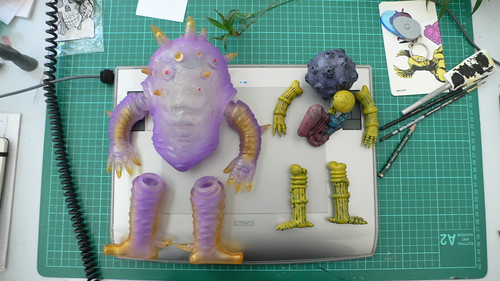
Second step is the removal of the paint. As I was applying the paint thinner another surprise was waiting for me. The yellow has pretty much seeped into the vinyl. I haven't been able to remove any of it.

Image

Stay tuned for more pictures.

Author:  uberboy [ Sat Jun 26, 2010 10:37 am ]
Post subject:  Re: Custom Clear Eyezon WIP

i believe the eyezon is made of thinner vinyl from China, which may explain the permanent yellowing. I am unsure of what the typical differences between chinese and japanese vinyl are. but people here seem to think the vinyl from china is cheaper/thinner and either more-brittle or too flexible. i don't collect enough from china to really know.

have fun with this guy. the guts have a lot of possibilities.

Author:  idle. [ Sat Jun 26, 2010 10:59 am ]
Post subject:  Re: Custom Clear Eyezon WIP

uberboy wrote:
i believe the eyezon is made of thinner vinyl from China, which may explain the permanent yellowing. I am unsure of what the typical differences between chinese and japanese vinyl are. but people here seem to think the vinyl from china is cheaper/thinner and either more-brittle or too flexible. i don't collect enough from china to really know.

have fun with this guy. the guts have a lot of possibilities.


The main difference is not necessarily the thickness of the vinyl. As far as I know Japanese vinyl is slush molded with a plastic that is liquid at room temperature and needs to be hardend by heating while Chinese vinyl is made from plastic pellets that need to be heated to be liquid and also it is rotocasted. I am not sure why Japanese vinyl has almost a glass-like quality but I assume that the molds and wax masters are better, meaning they are a lot smoother on the surface and thus there is less refraction. I might be wrong though.

As for the stain, Paul Kaiju commented on my flickr photo and said that gold paint (as is used on these Eyezons) always contains clear yellow as base color and it seems to have a tendency to stain the vinyl as opposed to just staying on the surface. I guess it must be due to a different chemical composition of the colors.

It would have been nice to start the custom with a completely uncolored piece but now I have to improvise with the yellow already being in place. I am not sure I am going to use the guts actually but on the other hand it might be a waster not to incorporate them...

Author:  M.A.R.T.A [ Sat Jun 26, 2010 11:46 am ]
Post subject:  Re: Custom Clear Eyezon WIP

With yellow or without yellow
i belive that will be a great work :)

Author:  meanmistert [ Sat Jun 26, 2010 12:35 pm ]
Post subject:  Re: Custom Clear Eyezon WIP

Sometimes I think it's fun/challenging to have to work around issues like this... you get to choose whether to incorporate it in the new paintjob.

and if you don't use those guts, just send 'em to me!

Author:  Prometheum5 [ Sun Jun 27, 2010 8:46 am ]
Post subject:  Re: Custom Clear Eyezon WIP

Having done a few clear Eyezons using the purple figure, the yellow is just something you learn to work around. I always tried to work it back in to my paint scheme somehow, and that usually works pretty nicely. My best advice to you is that if you want to keep the clear aspect, I would strongly recommend you give the freshly stripped vinyl a high gloss coat inside and out before painting anything. The Chinese vinyl used on the Eyezon isn't as clear as say, Gargamel's, but if you gloss it up, it gets much better. Take a look at some of my pics to see what I mean.

The other thing to watch out for is putting the limbs back in... I haven't been able to do it yet without having to do at least some clean up and touch ups, especially on the limbs. The biggest problem areas for paint scraping are around the elbows and feet. Glossing the inside makes this a bit more of a problem, but some careful use of Q-tips with acetone will fix those problems.

Author:  dedoperucelli [ Sun Jun 27, 2010 1:38 pm ]
Post subject:  Re: Custom Clear Eyezon WIP

I also had your same problems with this toy ... ugly vinyl, partial clearing.
I used strong modes... heavy paint ! :lol:


Image

Author:  Sokko [ Sun Jun 27, 2010 3:18 pm ]
Post subject:  Re: Custom Clear Eyezon WIP

^^^^^^^
Now THAT is a great looking Eyezon!!

Author:  idle. [ Mon Jun 28, 2010 1:34 am ]
Post subject:  Re: Custom Clear Eyezon WIP

meanmistert wrote:
Sometimes I think it's fun/challenging to have to work around issues like this... you get to choose whether to incorporate it in the new paintjob.

and if you don't use those guts, just send 'em to me!


@meanmistert: I completely agree. I wasn't too thrilled at first about having to deal with the yellow stains (haha!) but now it has become a challenge that I want to overcome and integrate. :lol:

Prometheum5 wrote:
Having done a few clear Eyezons using the purple figure, the yellow is just something you learn to work around. I always tried to work it back in to my paint scheme somehow, and that usually works pretty nicely. My best advice to you is that if you want to keep the clear aspect, I would strongly recommend you give the freshly stripped vinyl a high gloss coat inside and out before painting anything. The Chinese vinyl used on the Eyezon isn't as clear as say, Gargamel's, but if you gloss it up, it gets much better. Take a look at some of my pics to see what I mean.

The other thing to watch out for is putting the limbs back in... I haven't been able to do it yet without having to do at least some clean up and touch ups, especially on the limbs. The biggest problem areas for paint scraping are around the elbows and feet. Glossing the inside makes this a bit more of a problem, but some careful use of Q-tips with acetone will fix those problems.


@Prometheum5: Thanks for the advice. I was going to gloss both sides of the vinyl because I figured that this would help improve the clear look of the vinyl. As for the inner parts I already realized that these would be difficult to put back into place without scraping as they already did that when I removed them. I will check out your pictures.

@dedoperucelli: Beautiful paint job. :)

Author:  idle. [ Fri Jul 23, 2010 5:10 am ]
Post subject:  Re: Custom Clear Eyezon WIP

Finally a little update to this project.

A few days ago I colored the eyezon using rit dye. Using pink the yellow dye turned into a beautiful orange/red.

Image

Author:  TroyStith [ Mon Aug 16, 2010 8:40 am ]
Post subject:  Re: Custom Clear Eyezon WIP

I can't wait to see this finished man! The pinks turned out great

Author:  ted kopper [ Mon Aug 16, 2010 4:00 pm ]
Post subject:  Re: Custom Clear Eyezon WIP

awesome man, its coming out great, keep it up!

Author:  OsirisOrion [ Wed Aug 18, 2010 7:33 pm ]
Post subject:  Re: Custom Clear Eyezon WIP

any update on this custom? don't hold out on us lol :D

Author:  Martoy Black [ Thu Aug 19, 2010 12:14 am ]
Post subject:  Re: Custom Clear Eyezon WIP

Great work Daniel! But i agree with Osiris ;) If you have an update please don't hold it out on us. "Jester" Dorol is looking for a curvy orange/red special someone for reproduction.

Author:  idle. [ Fri Sep 03, 2010 7:29 am ]
Post subject:  Re: Custom Clear Eyezon WIP

Martoy Black wrote:
Great work Daniel! But i agree with Osiris ;) If you have an update please don't hold it out on us. "Jester" Dorol is looking for a curvy orange/red special someone for reproduction.


I am sorry to keep you waiting for such a long period of time...

Image

Finally. Not finished yet but I found some time and good weather today to apply decals (a first for me) and several layers of high gloss coat.

Author:  Martoy Black [ Fri Sep 03, 2010 7:34 am ]
Post subject:  Re: Custom Clear Eyezon WIP

Np! Def worth the wait :D Woow! Love what you've done with the eyes!

Author:  melvegas [ Fri Sep 03, 2010 7:52 am ]
Post subject:  Re: Custom Clear Eyezon WIP

i really like how the pink turned out, and the gloss coat really makes a big difference.

so how do you actually colour it with rit dye? do you soak the vinyl in the dye? or spray it on? or paint it?

sorry if it sounds really obvious, i've never done any custom work, but am always fascinated with people's process.

Author:  idle. [ Fri Sep 03, 2010 8:04 am ]
Post subject:  Re: Custom Clear Eyezon WIP

melvegas wrote:
i really like how the pink turned out, and the gloss coat really makes a big difference.

so how do you actually colour it with rit dye? do you soak the vinyl in the dye? or spray it on? or paint it?

sorry if it sounds really obvious, i've never done any custom work, but am always fascinated with people's process.


RIT Dye is a product that is actually more intentioned for coloring shirts and cloth, as far as I know. Somehow a clever customizer found out that it actually works with vinyl as well. The dye can be bought either a liquid or as a powder but needs to be diluted with some water in a big pot. You bring the water close to boiling temperature and soak the pieces until they have the intensity of color that you want them to have. In short, that is basically everything there is to know. There is a thread on dyeing vinyl here on the forum but I can't find it at the moment.

Author:  dustin [ Fri Sep 03, 2010 9:46 am ]
Post subject:  Re: Custom Clear Eyezon WIP

http://skullbrain.org/bb/viewtopic.php?f=19&t=30292

Author:  idle. [ Fri Sep 03, 2010 10:03 am ]
Post subject:  Re: Custom Clear Eyezon WIP


There, from the man himself! Thanks a lot, dustin. :D

Author:  idle. [ Sat Sep 04, 2010 9:19 am ]
Post subject:  Re: Custom Clear Eyezon WIP

Step by step a little progress. Here is another shot. I'm almost done with this just a few things remaining. Full reveal some time next week.

Image

Author:  idle. [ Tue Sep 07, 2010 5:44 am ]
Post subject:  Re: Custom Clear Eyezon WIP

Yesterday was a sunny day and I loved how the sunlight lit up the whole clear vinyl. So there is a little update to the custom.

8)

Image

Author:  idle. [ Fri Sep 10, 2010 7:17 am ]
Post subject:  Re: Custom Clear Eyezon WIP

Finally. It's finished. It took a bit longer than I expected but it's been worthwhile. I am really happy how this turned out.

Background story:
Quote:
Metamorphin Capsules have always been a popular present in the Netzwerk societies so the company decided to release a special collectors edition honoring it's best customers. About 250 of the most valuable short term body enhancing capsules are encased in a glittery clear humanoid character which shifts its colors according to various factors such as weather, time of the day or even the mood of its owner. Advice on the best capsule for the moment can be requested on a similar set of data and at night a light inside the semi-intelligent brain of the creature lights up making it even suitable for that long club weekend ahead!


Stats:
Clear Eyezon dyed with RIT dye filled with ca. 250 Metamorphin capsules and a RIT dye colored brain that features a motion activated blinking LED. Dusted with sparkling rainbow glitter from the inside and covered with a thick automotive high gloss coat.

LED action (+ a bit of photoshop action)
Image

Eyezon from the front
Image

Arm detail
Image

Face detail
Image

PS.: This is a commission. It is not available for purchase.

Author:  dustin [ Fri Sep 10, 2010 11:48 am ]
Post subject:  Re: Custom Clear Eyezon - finished! 10.11.2010

I really like the colors on the arms and legs. Looks like the dye totally worked out for you and you really made the yellowing of the clear work for you here. Nice.

That said, I'm not really feeling the way you treated the eyes on this guy. I don't think the triangle-shaped decals are enough to make them stand out from the rest of the sculpt. Even in the close-ups it takes a moment for me to realize that the triangles are placed where the eyes are sculpted. Maybe if you'd backed them up with some transparent color before placing the decals they'd be more prominent and recognizable as eyes.

I think I'd also like to see more of the great colors you've got going on on his limbs happening on his body. The capsules inside are kinda cool, but not nearly as vibrant as the arms and legs. I think the clear vinyl and the glitter obscures them a little too much for their color to "pop." Relative to the limbs, the torso falls kinda flat.

Still, your custom is definitely well-executed and creative. Thanks for posting the WIP pics and keeping us updated. It's been fun watching this one come together. 8)

Author:  idle. [ Fri Sep 10, 2010 2:13 pm ]
Post subject:  Re: Custom Clear Eyezon - finished! 10.11.2010

dustin wrote:
I really like the colors on the arms and legs. Looks like the dye totally worked out for you and you really made the yellowing of the clear work for you here. Nice.

That said, I'm not really feeling the way you treated the eyes on this guy. I don't think the triangle-shaped decals are enough to make them stand out from the rest of the sculpt. Even in the close-ups it takes a moment for me to realize that the triangles are placed where the eyes are sculpted. Maybe if you'd backed them up with some transparent color before placing the decals they'd be more prominent and recognizable as eyes.

I think I'd also like to see more of the great colors you've got going on on his limbs happening on his body. The capsules inside are kinda cool, but not nearly as vibrant as the arms and legs. I think the clear vinyl and the glitter obscures them a little too much for their color to "pop." Relative to the limbs, the torso falls kinda flat.

Still, your custom is definitely well-executed and creative. Thanks for posting the WIP pics and keeping us updated. It's been fun watching this one come together. 8)


Thank you very much, Dustin for taking the time to write this very constructive and honest criticism. Indeed, you are not the first to mention the eyes or rather their lacking visualization. I see that a bit of color on the eyes would also probably have helped adding some interest to the otherwise flat color of the body. I added a little dyed fade to the main body but unfortunately that was lost as well with the capsules inside. So yeah, you're definitely right about the issues you pointed out and it is good to have learned a lot (including the above mentioned) while making this and still having a good result overall.

Page 1 of 2 All times are UTC - 8 hours [ DST ]
Powered by phpBB © 2000, 2002, 2005, 2007 phpBB Group
http://www.phpbb.com/