| Author |
Message |
|
Robert DeCastro
Side Dealer
Joined: Tue Apr 24, 2007 10:31 am
Posts: 2216
Location: In Limbo

|
 How To Work With Casteline Sculpting Wax Thought I'd contribute this little article I've written for those that are seeking an alternative to Sculpy as a sculpting medium when designing toys. For the most part I will cover how to work with Casteline wax and the tools and techniques I've used. What is Casteline? Casteline is a fairly new sculpting wax that comes in three different hardness (soft, medium, hard). It's self supporting so there is no need for an armature and aside from the more rigid Azbro wax it is the second choice for sculptors as the medium for prototyping work in the toy design industry. It only takes a small amount of heating (hair dryer/heat gun, light bulb/heat lamp, heat from your hands) to get Casteline to work like clay. There is no baking involved so it's ideal for when revisions to the sculpt is required. This is the reason why toy companies reject prototype work done in polymer clays or any material that are difficult to revise with relative ease. Why use Casteline? Unlike traditional rigid sculpting wax, Casteline when heated becomes malleable like clay. It's a great transition from polymer clay specially when used as a sculpting medium for toy design and other prototyping applications. You can make any revisions with Casteline no matter how drastic or simple that maybe without re-baking like polymer clays and risk cracking you hard work. You just need a few extra tools to work with wax but the benefit is well worth it. Lets start. You'll need some basic tools (some you may already have) specifically needed to work with any type of sculpting wax. Small crock pot (available at any Wal-Mart) for melting wax into sheets, metal sculpting tools (metal cause you will need to heat it), electric wax pen (optional), alcohol lamp/burner, alcohol torch, and clay shapers (optional). I'll cover other incidentals as I go along so please do read on. metal sculpting and dentist tools 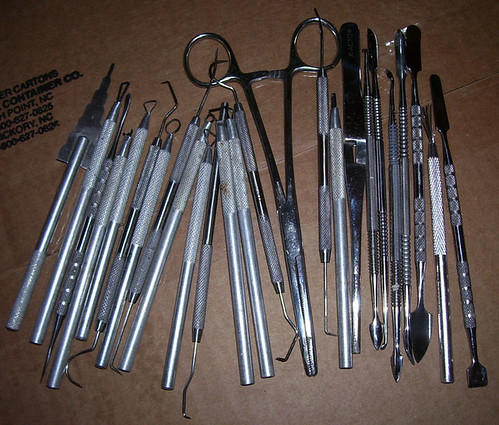 As I've already mentioned, armatures are not needed when working with Casteline. To save on material however you should use a filler like crushed tin foil. I usually start with a basic form using hard Casteline and switch to medium to build it up and for detail work. Soft is too fragile for me and I for the most part do not use it. Casteline comes in 2.5 pound tubs. When you have purchased your wax you should prepare it for use by melting it into sheets. Use a standard crock pot dedicated for wax use, once you use it for wax you can't use it for preparing food anymore. Casteline wax in sheets 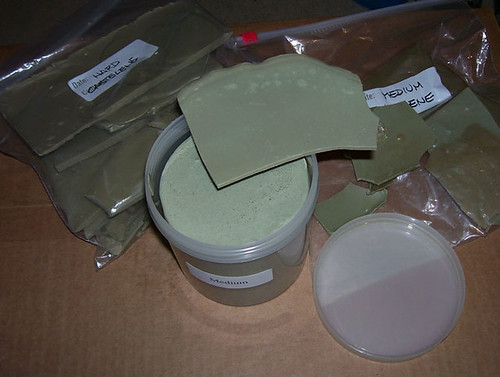 Melt the wax using the high setting on your Crock Pot until most of the wax becomes like soft semi melted ice cream then switch to the medium or low setting depending on how hot you pot gets. The idea is to melt the wax without boiling it. Casteline will separate so keep an eye on it and keep stirring it, making sure to scrape the bottom. Casteline has a caramel like smell that some folks like or hate so make sure to do this away from your common area just incase. Prepare a flat baking pan (or two) lined with tin foil. Once the wax is completely melted, pour the wax onto the pan/s into sheets (make sure to completely stir the wax scraping the material that has settled to the bottom before pouring or you will have some inconsistencies in your wax. Be careful not to burn yourself and use pot holders or better yet foundry type gloves. You can also use a ladle to scoop out melted wax but this takes too long for me. Do this to the entire content of the tub. If you're using different hardness make sure to scribe the hardness on the sheets to keep track of them. I keep the wax sheets I've prepared dust free in zip lock bags...So now that your wax is ready and your burns have healed (kidding) lets start sculpting. Start off by balling up some aluminum foil as a filler to avoid wasting wax. Assuming you have and are working off of a set of drawings, proceed on to generate you basic form by breaking off strips of wax from the wax sheets you prepared before hand. Heat the strips to a malleable state and build your form in layers. I have used hair dryers and heatguns for this application and they both work fine at warming the wax. You can also preheat them by having the wax sit under a bulb lamp but I found the hair dryer/heatgun system is more convenient for me. Hand warming will also work on smaller pieces. Working with Casteline will be like working cold extra firm Sculpy. It may feel like it's fighting you at first but you'll get use to it. Just be patient and take your time with the basic form since this is where you will build you detail on. alcohol burner and torch 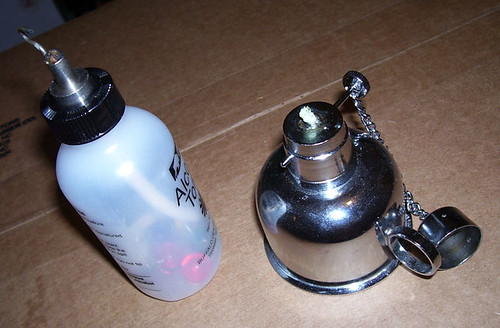 Smooth the surface by using a sculptors spatula or something similar heated over an alcohol burner. Your burner and torch should be filled with nothing other than denatured alcohol. It burns clean and hotter than plain candle flame. I usually use hard Casteline for the basic form and then switch to medium hardness for fleshing it out and detail work. Work like your doing a sketch, rough form slowly working into a more defined shape and tighten up the line as you go. Once you have established a relatively smooth basic form you can move on the flesh it out, smooth again, add even more fine details and repeat. If the whole sculpture is too soft where it get bruised by handling then place it in the refrigerator for a few minutes to cool. I have a habit of leaving fingernail marks because I man handle the piece when I work on my sculpt that I make sure I trim my nails down as short as possible before working. That's another great thing about Casteline, you can place a reasonable grip on your work without leaving finger prints and negating the need for a sculptors turn table stand unless you're working on a very large piece. Not happy with the angle of the arms? You can easily fix that by heating the elbow area with a hair dryer/heatgun (careful not to melt your details out) and bending it to the desired angle. You can't do that with cured Sculpy without fracturing and doing a major re-sculpt then re-baking the whole thing and risking further cracks. metal tipped sculpting tools  Foredom wax carver 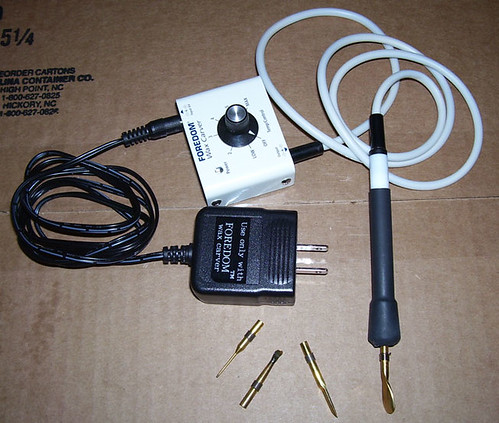 As you move on to tightening up your work and adding finer details you will need the use of your metal sculpting tools. You probably already have some favorite tools that you use when you worked with polymer clays. If you want to switch to Casteline type waxes you will need sculpting tools that can be heated over an alcohol burner. You should be able to find metal versions of your favorites without any problems. Some slight alterations will inevitably be needed in your sculpting technique but this should not be too far removed from what you're used to and you may be pleasantly surprised at new ones you develop. One favorite tool of mine are ball tipped sculpting tools that I use for smoothing/blending/merging on added details. Just heat the tool for a few seconds tops (heat longer as needed but try it out on scrap pieces first specially when experimenting). For bigger jobs where continuous heat is required or when removing a substantial amount of material, a jeweler's wax pen (with a large spoon tip) would be a worthwhile investment. This is also ideal for adding stippling and other surface effects depending on the tip being used. Silicone tip clay shapers 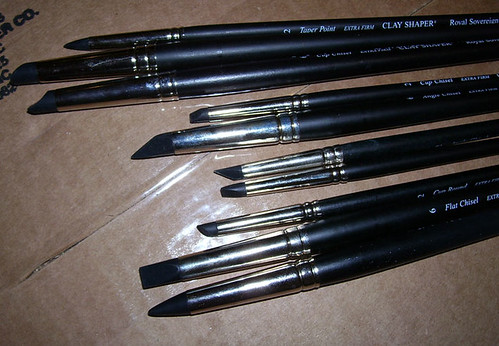 D-Lemonene  Aside from traditional sculpting tools, I've also found metal dentist tools (easily found in eBay or local flea markets) to be very useful and inexpensive. Another tool I've recently discovered are silicone tip clay shapers. These tools resemble paint brushes but with a silicone tip (wont stick to your work) that comes in different shapes and firmness. I use the black extra firm tips for wax use. Use it on warm areas as an extension of your finger tips for those hard to reach areas. When you're ready to buff or polish Casteline, a small amount of D-lemonene, Goo Gone, Mineral Oil, Citrusol, Wintergreen Oil or a dab of petroleum jelly (Vaseline) on a discarded piece fine mesh lady's nylon stocking works great. A little goes a long way and too much of any of the above mentioned will result in an orange peel like texture on your sculpture so go easy and start on an inconspicuous area. Personally I like to use an alcohol torch to put a quick polish on the surface. This requires a complete familiarity with an alcohol torch and it's effect on wax so get used to using it first on scrap pieces of wax to get your finesse with the torch established. Also keep in mind that your sculpture can have a nice finished surface with plain old buffing by your own hands and tools. The sculpture I'm currently working on is untouched by any of the polishing/buffing chemicals/compounds I've mentioned. Just my hands, tools, and patience. Casteline and silicone RTV compounds: Since Casteline is specially formulated for prototype use, it is completely compatible with virtually all brands of silicone mold making compounds. There are pretty much no changes in the way you would normally generate molds for masters done in Casteline wax. Just keep in mind that it is wax and not a rock hard piece of cured polymer clay that you're working with this time around. Make sure your sculpt has had a chance to cool completely to assure that it's completely hard and ready for mold making. This is specially true when you're partially imbedding your sculpt to generate mold halves. I hope this little article has been helpful. Casteline isn't for everyone but hopefully you'll find what I've written compelling enough to give it a real try. I switched shortly after I first discovered it a few years ago and never looked back. It's worlds easier that traditional prototyping wax like Azbro and makes a perfect alternative to traditional and polymer clays for toy design applications. You can purchase Casteline, D-Lemonene, Foredom wax pen and other wax sculpting tools @ http://www.sculpt.com/ . Accept for the Casteline wax itself all the tools and liquid solutions mentioned in the article may also be available at you favorite art/hobby supply shops, local hardware stores and places like good ole eBay.
|
| Wed Mar 03, 2010 9:30 am |
 
|
|
|
dustin
Addicted
Joined: Wed Dec 10, 2008 8:22 am
Posts: 748
Location: San Francisco
|
Re: How To Work With Casteline Sculpting Wax Wow, thanks for the writeup, Robert. Lots of great information in there.
_________________
shop: http://dustinsmonstershop.bigcartel.com/
ultra-thread: http://www.skullbrain.org/bb/viewtopic.php?f=19&t=35477
flickr: http://www.flickr.com/photos/bigwinner/
|
| Wed Mar 03, 2010 9:49 am |
|
|
|
JoeMan
S7 Royalty
Joined: Mon Dec 03, 2007 11:29 am
Posts: 3818
Location: NY
|
Re: How To Work With Casteline Sculpting Wax Yes, thank you.
I'll have to give it a try.
_________________
Splurrt
|
| Wed Mar 03, 2010 9:58 am |
|
|
|
Leecifer
Side Dealer
Joined: Thu Dec 27, 2007 6:06 pm
Posts: 2018
Location: Oaktown hills
|
Re: How To Work With Casteline Sculpting Wax Fantastically informative. So many things I've wondered about. Dude this rocks. Thanks man!!!
_________________
You don't usually see a lot of fascism on a toy board until someone paints one!
Wanted Thread
|
| Wed Mar 03, 2010 12:59 pm |
|
|
|
seanb
Toy Prince
Joined: Fri May 02, 2008 2:57 pm
Posts: 206
|
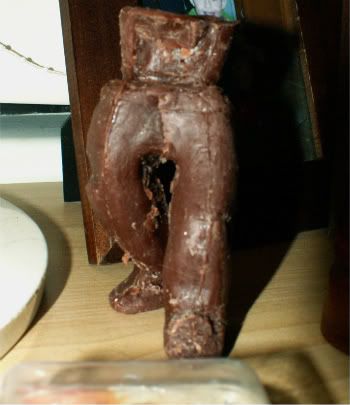
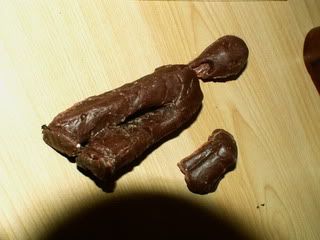
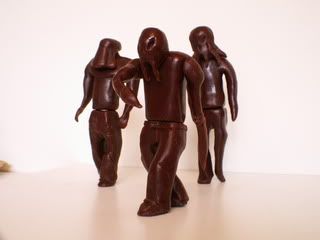
Re: How To Work With Casteline Sculpting Wax Great post Rob. I've toyed with wax a few times, most notably in my Intergaladiator figure. I used willow's "fuse" wax. That particular wax is soft, so I had a lot of trouble with breakage. Smoothing was a I FART A LOT too. These are some in-progress pics. 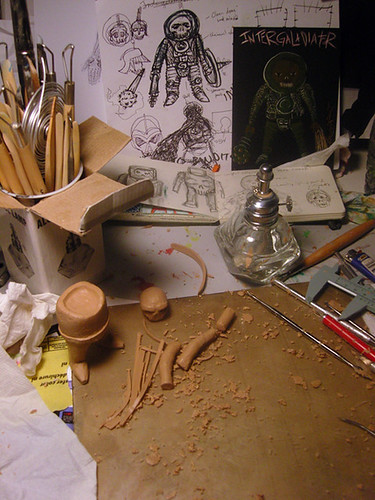 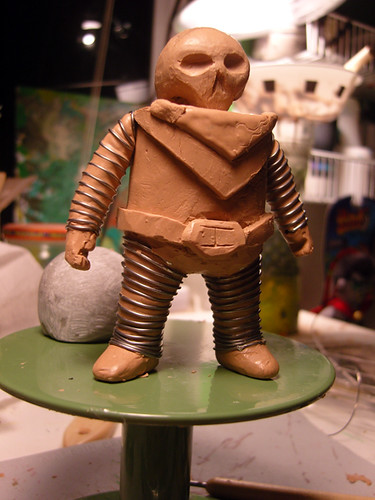 You can see my makeshift wax melter in the top right corner in the second image. Overall I really like wax, and it does offer a lot of freedom over Sculpey, but the learning curve is a bit higher. Next sculpt is definitely going to be in wax or Castiline (plus I just got a wax pen! Can't wait to use it).
_________________
MONSTREHERO
MONSTREFLICKR
MONSTRESHOP
|
| Wed Mar 03, 2010 2:12 pm |
|
|
|
Robert DeCastro
Side Dealer
Joined: Tue Apr 24, 2007 10:31 am
Posts: 2216
Location: In Limbo
|
Re: How To Work With Casteline Sculpting Wax Thanks, I felt like a kid working on this like a school report for a better part of a week. I hope allot of people find it usefull enough so it doesn't get buried too fast. Anyway yeah I love working with wax. You can really fine tune your sculpt down to a tee or let it be crude like a Bemon. Your skill and imagination is the only limit once you get the hang of it.
@seanb = I'm familiar with the wax you're using. I can tell you're gonna love Casteline.
_________________
New figure "Parasight" & "Walking Head" here viewtopic.php?f=6&t=48402
Looking for...viewtopic.php?f=26&t=34235&p=891489#p891489
|
| Wed Mar 03, 2010 2:41 pm |
|
|
|
Rich
Die-Cast
Joined: Tue Mar 07, 2006 8:46 pm
Posts: 11806
|
Re: How To Work With Casteline Sculpting Wax Can we get this made into a sticky ?
Excellent write up and cant wait until I have the time to read it without being interrupted.
|
| Wed Mar 03, 2010 8:28 pm |
|
|
|
JoeMan
S7 Royalty
Joined: Mon Dec 03, 2007 11:29 am
Posts: 3818
Location: NY
|
Re: How To Work With Casteline Sculpting Wax Hey Robert, do you know if I can mold the sculpey piece I'm working on now and cast it with wax? Any tips or recommendations on how to do it?
_________________
Splurrt
|
| Wed Mar 03, 2010 8:57 pm |
|
|
|
seanb
Toy Prince
Joined: Fri May 02, 2008 2:57 pm
Posts: 206
|
Re: How To Work With Casteline Sculpting Wax JoeMan wrote: Hey Robert, do you know if I can mold the sculpey piece I'm working on now and cast it with wax? Any tips or recommendations on how to do it? I've read that you can make a mold and cast it with molten wax. You heat the mold before you do it so the wax and the mold cool at the same rate to prevent the wax from shrinking. You could probably do it with a cheapie brush-on silicone and plaster mother mold to save on costs.
_________________
MONSTREHERO
MONSTREFLICKR
MONSTRESHOP
|
| Wed Mar 03, 2010 9:38 pm |
|
|
|
GERMS
Line of Credit
Joined: Tue Feb 27, 2007 5:29 am
Posts: 1636
|
Re: How To Work With Casteline Sculpting Wax Great tut' Robert. Nice shots. I used wax when I made my scrubbies a friends homemade stuff he collected from cheeses and some beeswax over the years, good stuff  I first sculpted from plasticene, (prob' not the best move) took fibreglass molds then poured the wax into them and pulled em out. Fibreglass is rigid so it really cut the casts up and I had a lot of cleaning up to do. Working with the wax was fun and very forgiving stuff, way tougher than you would think, though you cant sand it like you can polymer clays so I couldnt get the surfaces as smooth, though the heating method to smooth it out is cool. I will definitely be working with it again and would love to give castilene a go. On another note, I have just ordered some of those clay rubber tips you posted. What size are those? I am giving chavant clay ago. They should make life easier. Working with fingers, toothpicks and pen tips is starting to shit me off
|
| Thu Mar 04, 2010 2:49 am |
|
|
|
Robert DeCastro
Side Dealer
Joined: Tue Apr 24, 2007 10:31 am
Posts: 2216
Location: In Limbo
|
Re: How To Work With Casteline Sculpting Wax @Rich = Thanks JoeMan wrote: Hey Robert, do you know if I can mold the sculpey piece I'm working on now and cast it with wax? Any tips or recommendations on how to do it? As SeanB said it can be done with a heated mold providing it's a silicone RTV mold since that can withstand lower temp oven baking. Results vary though since shrinkage can still occur in spots on larger pieces. If the piece you're working on is pretty much finish and you don't foresee any more revisions or any re-baking you can always do the other pieces in wax. Personally I would just finish that one in the same medium and switch to wax on the next project. GERMS wrote: Great tut' Robert. Nice shots. On another note, I have just ordered some of those clay rubber tips you posted. What size are those? I am giving chavant clay ago. They should make life easier. Working with fingers, toothpicks and pen tips is starting to shit me off Thanks Germs, The Clay Shapers are by Royal Sovereign LTD. I have the black extra firm angle chisel, flat chisel, taper point, cup chisel, and cup round in both size 6 and 2. I don't know if it comes larger that a six but I figure I can just use my fingers for anything requiring something larger than a six.
_________________
New figure "Parasight" & "Walking Head" here viewtopic.php?f=6&t=48402
Looking for...viewtopic.php?f=26&t=34235&p=891489#p891489
|
| Thu Mar 04, 2010 7:21 am |
|
|
|
GERMS
Line of Credit
Joined: Tue Feb 27, 2007 5:29 am
Posts: 1636
|
Re: How To Work With Casteline Sculpting Wax hmm i bought size zero 'cause Im working on a small piece though i think i want to get some bigger sizes to. thanks.
|
| Thu Mar 04, 2010 8:48 am |
|
|
|
GERMS
Line of Credit
Joined: Tue Feb 27, 2007 5:29 am
Posts: 1636
|
Re: How To Work With Casteline Sculpting Wax
|
| Thu Mar 04, 2010 9:22 am |
|
|
|
Robert DeCastro
Side Dealer
Joined: Tue Apr 24, 2007 10:31 am
Posts: 2216
Location: In Limbo
|
Re: How To Work With Casteline Sculpting Wax You did a great job cleaning that up. What did you use?
_________________
New figure "Parasight" & "Walking Head" here viewtopic.php?f=6&t=48402
Looking for...viewtopic.php?f=26&t=34235&p=891489#p891489
|
| Thu Mar 04, 2010 9:54 am |
|
|
|
GERMS
Line of Credit
Joined: Tue Feb 27, 2007 5:29 am
Posts: 1636
|
Re: How To Work With Casteline Sculpting Wax Robert DeCastro wrote: You did a great job cleaning that up. What did you use? Heated tools to scrape it all down then a propane bottle and torch to heat the surface to where it sort of liquifies (this is great for getting a smooth shiny surface but you have to be careful not to melt it) and also turps and brush is great for smoothing bits out.
|
| Thu Mar 04, 2010 8:59 pm |
|
|
|
redhanded
Side Dealer
Joined: Sun Dec 17, 2006 11:16 pm
Posts: 2135
|
Re: How To Work With Casteline Sculpting Wax Thanks for posting this, my brother does sculpt and he uses some of this stuff and I'd like to start. He does older hammer horror, lovecraft stuff... no kaiju, yet
_________________
Everyone wants to be a fucking cop until they actually have to help someone.
http://www.flickr.com/photos/redhanded
Wanted - M-POP Marusan MechaGodzilla Pink set, Dream Rocket Oddities
|
| Sun Mar 07, 2010 11:17 am |

|
|
|
Robert DeCastro
Side Dealer
Joined: Tue Apr 24, 2007 10:31 am
Posts: 2216
Location: In Limbo
|
Re: How To Work With Casteline Sculpting Wax Then you're ahead of the game. Your bro should be a good resource of information and he's probably amassed a great deal of tricks to make it even easier for you to try wax.
_________________
New figure "Parasight" & "Walking Head" here viewtopic.php?f=6&t=48402
Looking for...viewtopic.php?f=26&t=34235&p=891489#p891489
|
| Thu Mar 11, 2010 6:48 am |
|
|
|
Paulkaiju
S7 Royalty
Joined: Mon Nov 28, 2005 1:40 pm
Posts: 3847
Location: SD
|
Re: How To Work With Casteline Sculpting Wax Hah!!!!! Wax rules. Don't leave it in the crock pot on high and decide to take a nap. After you see it all boiled over after your nap, don't touch it either.  And the alcohol torch is a definite beneficial tool! I was messing with it all day and didn't really see the results I wanted until I used it. It's a different thing than sculpey that's for sure. you have to pay wayy more attention because you're working with direct heat. You can get some really cool textures as well!
_________________

|
| Mon May 03, 2010 8:31 pm |
|
|
|
melek_taus
Mini Boss
Joined: Mon Aug 06, 2007 4:48 pm
Posts: 4668
Location: Where the brightest angel fell.
|
Re: How To Work With Casteline Sculpting Wax Awesome, informative post! Thanks. Would be cool if this was stickied. 
_________________
Need help finding: EMan x Dorol Mash-up from NYCC and Green Space X from SkullHeadButt.
|
| Tue May 04, 2010 3:58 pm |
|
|
|
Robert DeCastro
Side Dealer
Joined: Tue Apr 24, 2007 10:31 am
Posts: 2216
Location: In Limbo
|
Re: How To Work With Casteline Sculpting Wax EVOM wrote: JoeMan wrote: I've been meaning to try it, just haven't gotten around to it. Too comfortable with my current methods. Maybe some of the guys on the board who have used it could chime in with their preference or pros/cons vs an epoxy clay. i've never used it but it seems cool. I like that you can handle it. I have a jeweler friend that uses it alot, I'm gonna have to get some off of him. I wonder if it's hard bulding it up if you take too much off. but maybe it's not that big of a deal. A great way to keep the wax soft while you work is to buy a wide dome spot lamp from the hardware store and clamp it on your work table with the dome facing up. Then take a small cookie pan (big/small enough to cover the dome) lined with tin foil and place sheets of sculpting wax on it. 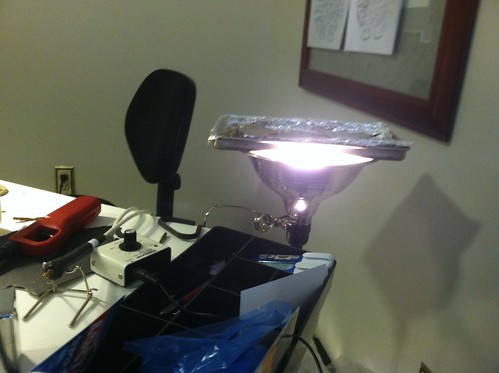
_________________
New figure "Parasight" & "Walking Head" here viewtopic.php?f=6&t=48402
Looking for...viewtopic.php?f=26&t=34235&p=891489#p891489
Last edited by Robert DeCastro on Mon Dec 12, 2011 11:30 am, edited 1 time in total.
|
| Mon Dec 12, 2011 11:12 am |
|
|
|
Robert DeCastro
Side Dealer
Joined: Tue Apr 24, 2007 10:31 am
Posts: 2216
Location: In Limbo
|
Re: How To Work With Casteline Sculpting Wax melek_taus wrote: Awesome, informative post! Thanks. Would be cool if this was stickied. Hey Joe, any chance we can make melek_taus ole request happen? I see folks actually looking for this info enough times. PLEASE 
|
| Mon Dec 12, 2011 11:15 am |
|
|
|
Onion
Toy Prince
Joined: Fri Jun 03, 2011 2:52 pm
Posts: 275
|
Re: How To Work With Casteline Sculpting Wax Whoah! First time I've seen this. Too fuckin cool...thanks for this Robert!!!!
_________________
Roses are red, violets are blue; お前はもう死んでいる
|
| Tue Dec 13, 2011 10:37 am |
|
|
|
D-Lux
Line of Credit
Joined: Sun Apr 29, 2007 7:56 pm
Posts: 1529
Location: DETROIT
|
Re: How To Work With Casteline Sculpting Wax I'm actually sculpting my first toy in wax this winter. Great info!
_________________
Wants
FLICKR
STORE
|
| Tue Dec 13, 2011 6:55 pm |
|
|
|
Robert DeCastro
Side Dealer
Joined: Tue Apr 24, 2007 10:31 am
Posts: 2216
Location: In Limbo
|
Re: How To Work With Casteline Sculpting Wax Glad you guys find it useful. I'll update when I find new and easier ways to use this stuff.
_________________
New figure "Parasight" & "Walking Head" here viewtopic.php?f=6&t=48402
Looking for...viewtopic.php?f=26&t=34235&p=891489#p891489
|
| Wed Dec 14, 2011 10:00 am |
|
|
|
D-Lux
Line of Credit
Joined: Sun Apr 29, 2007 7:56 pm
Posts: 1529
Location: DETROIT
|
Re: How To Work With Casteline Sculpting Wax When I used to make jewelry I we used a lot of wax to make intricate pieces... You can do so much more with wax than polymer clay.
_________________
Wants
FLICKR
STORE
|
| Thu Dec 15, 2011 9:55 pm |
|
|